
I know it's been a while...a damn long while...but hey, sometime's life is just fucked and you run out of steam, have nothing left to give and feel like disappearing for a while. No? Well...with that said, I feel like I've at least found some direction again and have some motivation for the first time in months. It's been a rough year.
Anyway, I've already written about my experiences as DoP, Editor and Colourist on Robin Brown's film 'The Resurgence' a Pokemon fan film, many times...and I'm sure you're sick of that by now hehe...But every time I revisit a shot, it get's me excited and reminds me of the great experience that involved struggles and success, team work and all the other fun stuff that comes with filmmaking. I get asked a LOT to break down lighting from the teasers, so here's another shot below...one of my favorites.
THE LOCATION
Before I get into my decision on lighting and all that, it's totally worth talking about how fucking amazing this location is / was, and the story behind it. It was our second scout day and Reece Manning (our Producer and Director) had tee'd up a meeting with the owners of a lovely town house on Johnston Street in Collingwood. "This place will be Ash's place" he said. As we made our way up the stairs to the second floor we all noticed the strong smokey / burning smell that filled the house, but didn't say anything...I had a quick peek around the corner and saw black marks on the wall and what looked like a burned door. I was excited already...but not for what I was about to see. We got to the actual room up stairs and I instantly didn't like it haha....sorry!! Why? Well, it was supposed to be a run down and abandoned shack but it looked so clean and perfect. I know production designer Kate Ditton would work her magic on the place but it wasn't just that.
The windows. When I visit locations I either stress out or fall in love - It's never in between. Mostly because I'm thinking about how the heck I'm going to light a scene and where I'm going to put my lights! Since our character Ash was supposed to be living in an abandoned hide-out style shack - I didn't want to have light motivation coming from practicals because practically he wouldn't have power! So that meant candles and windows. In this case, a single window. The problem was, it was two stories up! Our biggest light stand wouldn't get that high and it would require running power out onto the street, getting a permit, having someone mind the light/s and well, it just worried the shit out of me. So, I was solidly against the location...but as we all know, indie films means indie budgets which means beggars can't be choosers...so I kinda knew I'd have to make something work with what we had. Damn it!!!
With a long face I began walking back down the stairs. I couldn't help but take another peak inside what appeared to be 'the burned room'. Gently and slowly pushing the door open, I was gobsmacked and almost aroused but the sheer filth and burntiness of the place...."THIS IS IT!!!!" I said to the producer who eventually peered his head into the room. There was burned furniture, burnt old photos on a burned wall, melted glass and black shit everywhere. It was so perfect in my mind and it had A FROSTED FUCKING WINDOW, on the ground floor hehe :) Perfect. I enthusiastically started telling the guys how I would set up the room and how I would light it....

Okay so back to reality...the burnt room was left that way because the insurance assessors were yet to do their shit with it. It was basically a no go zone and in two weeks it would all be ripped down (sad face). Like a roller-coaster (welcome to my life) my mood dropped again and I was beginning to think of ways to light the upstairs room...I was so shattered!! With extreme pessimism our Producer told me that he would talk to the owners and see what he could do. I wasn't hopeful...not sure if I could take another dip on the roller-coaster hehe ;) To cut an already long blog post short, REECE GOT THE DAMN PLACE! We had to shift the shooting schedule but it was so worth it :) ANYWAY!!! Why mention all that? Because I haven't even started rambling on about how lighting is the most important aspect of cinematography. Remember lighting is what will set you apart - it's the magic behind any great shot...right!?!?!? Well, yes and no. If I had to light the upstairs room, even with Kate's magic...I KNOW it would NOT be a shot featured on the blog. My point is that location and production design make every cinematographer's job a lot easier. All I had to do was sprinkle some light onto what was already fucking SICK! Of course, I could still screw it up, and good lighting would still be important, but I wasn't stressed anymore, I was inspired.
THE SETUP
Even though it was a bright day outside, the sun's intensity and direction was constantly changing. I had to somehow control that. Using black material and boards we did our best to block all of the lighting coming through the window. It was a tight fit between the window and the fence and we still had to squeeze lights in there too, but in the end we managed to cram 2 x Kino Flo (4 bank)'s and an Area 48 Soft LED into the space.


Here's the blacks half done - thanks to Glen Cook for all the effort here...it wasn't an easy space to work in (and was the only access to the on set toilets!).
So why Kino Flo? Why the extra little LED? My goal for this scene was to have a directional source, not a hard source. Why? I wanted NOT to make the light something you notice as a viewer. Sometimes a HMI smashing through a window just looks like a HMI smashing through a window hehe :) That's fine if your HMI is a 12K PAR with some distance and some warming filters...or you happen to have three 10K Tungsten's 20 meters away so that you can really give an idea of harsh sunlight coming from one direction....but we only had one 1.2K Fresnel, an old house circuit to power it AND it had to be up AGAINST the window due to the footpath and fence restrictions. The frosted windows were helping with diffusion anyway, but if I had thrown the 1.2K HMI, it would have been too punchy, too directional and too "oh I see you put a HMI through the window"....
Our alternative was the Kino's, even though slightly under powered for the exposure I needed (Tiffen Black Promist cuts nearly a full stop), they use fuck all power and produce a lovely soft light. Since Glen supplied us with two of them, I figured we'd use both and if we needed more light I could always reach for the LED...which is exactly what I ended up doing.
A few tweaks to the position of the kino's and LED (using the outside wall as a cutter and shaper) and I was almost happy. I'm rarely ACTUALLY happy...not for very long anyway hehe...the shot just didn't have enough contrast. My hero of the frame wasn't popping as much as I'd like. Now, the hard part was lighting him but nothing else, and keeping my light soft...(I already liked the background exposure) so I decided to use my cheap-ass photography softbox's as a toppy soft light which would bring out the details in Ash's face and shoulders and help separate him from the background - contrast :)
I wrote in more detail about these lights in my previous lighting article HERE if you're interested.
You can see here what they look like and how they were rigged (C Stands with gobo arms). I only used one for the shot I'm detailing here, but we shot several scenes in this room and these bad boys were used in every setup. The grids on the softbox's help control the spill of the light so as not to light the walls...this is really important when trying to maintain contrast. It's kind of like grading the shot in camera (something you should be trying to do with your lighting anyway).
A great way to assess your lighting is to look at each light separately. Systematically turn them on and off, building your scene, light by light. This can really help identify what each light is doing and gives you a very clear idea about what needs to be modified. Of course, it's best to look through your viewfinder when doing this, and that means that you'll be yelling across the set over everyone else who's trying to do their job...walkie-talkies are a good idea ;)
Although these crappy BTS shots don't show EXACTLY how the lighting was set, the below diagram does!
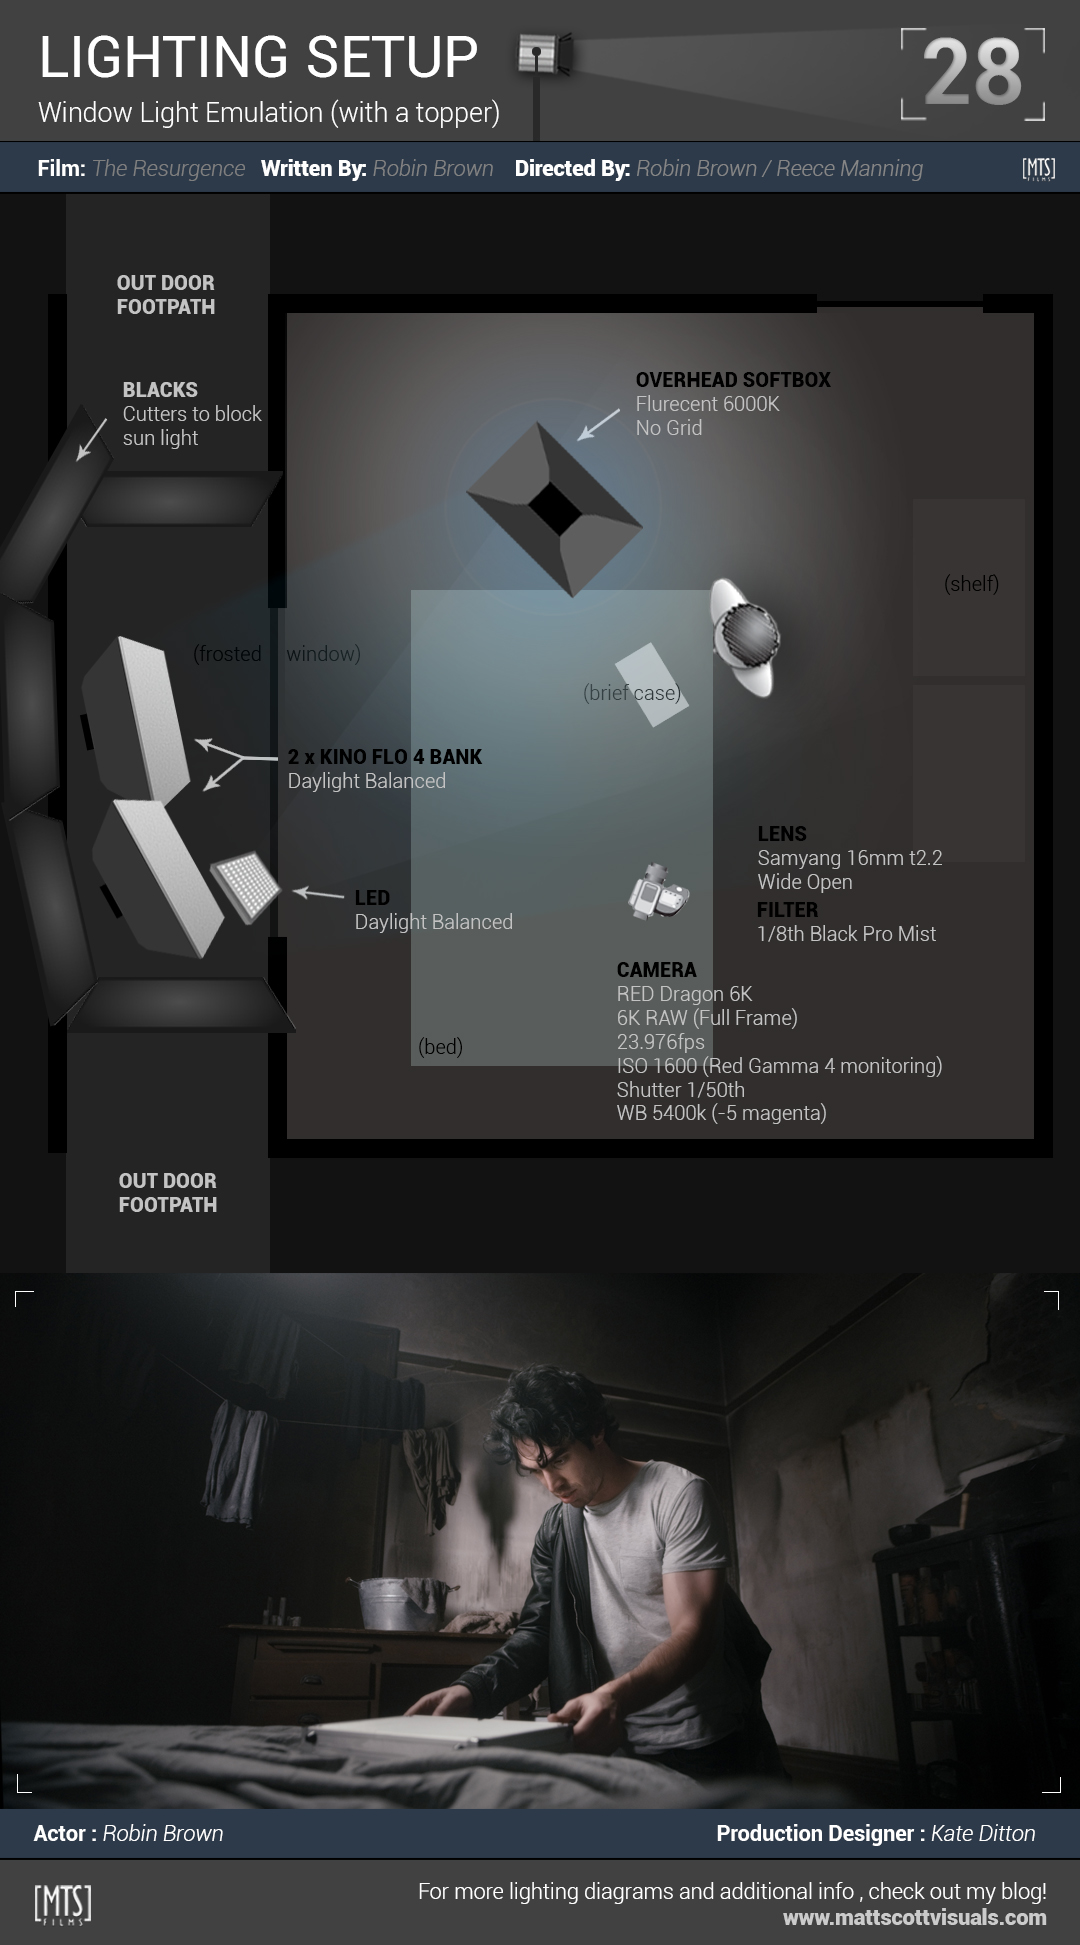
During the rehearsal as I was looking through my viewfinder, I noticed a wonderful reflection that bounced off of the silver briefcase, filling in Robin's face for a moment as he placed it on the bed. I asked if he would be okay deliberately positioning it in a way that it would happen and he agreed - nailed it every time :)
THE CAMERA
So what about my camera settings? Why 1600 ISO!?? Well, like I said I was about a stop under with my promist filter in front of the lens and I was really happy with my lighting - I didn't want to go messing with it now, besides, we were running out of time (as usual) so I upped the ISO instead. I normally rate RED at 800 ISO all day, every day (but sometimes 320 at night). I've been shooting with RED since 2011 and post processing it for just as long...this really gives me confidence when pushing exposure because I know what to expect. On top of that, I was shooting 6K Full Format - not to be confused with Full Frame - did you know that the RED Dragon 8K camera is THE ONLY RED CAMERA that can shoot 16:9 full frame with a 1:1 crop factor? RED ONE? Nope. RED Epic? Nope. RED Raven? Nope. RED HELIUM 8K? Nope. True story! Go and look for yourself :)
So, why would we shoot at 6K when we'll be delivering the film in 2K? One word (kind of two words)...Super-Sampling. I'll do a tutorial on that one day, but the short of it is, the more pixels you squish down into a smaller picture, the better...this means less noise (smaller noise pattern), better detail and of course the re-framing options you get later in post. This was actually quite useful for the featured shot because of the extreme lens distortion you get from a 16mm lens pointing up.
The other reason to shoot 6K on the RED Dragon (or use the full sensor on ANY RED camera) is because you ALMOST get full coverage on 35mm still's photography lenses. That's right...almost. RED Dragon at 6K FF (full format) gives you a 1.35x crop factor....which in the case of my Samyang 16mm lens is perfect. That lens is designed for an APS-C sensor which has a crop factor of around 1.6x...so on the Dragon....it JUST covers it...with some vignetting.
I monitored the shot at 2000 ISO just so I could get a better idea of what Robin's face would look like (and to give my awesome focus puller Kate Tartsus an easier image to work with), but later processed it at 1600 ISO. Another interesting thing about shooting RAW on RED (or RAW with any camera) is that once you're in post, it doesn't actually matter what ISO you choose, the noise will be the same...another true story. I'll be covering a lot of this stuff in great detail when "GRADE MY SHIT" begins later this year.
What about the white balance...why 5400K? Why not 5600K like my lights? Well, as you probably already know, your WB doesn't really matter that much when shooting RAW (because you can change it later without determent). I chose to monitor in at 5400K (with a slight pull on green to compensate for the fluro above) just because it looked closer to how I envisioned the grade...a little cooler :)
Finally, the Tiffen Black Promist filter. What does it do? Apart from STEAL YOUR LIGHT!! hehe ;) It adds a slight (depending on what strength you chose) bloom to your highlights and can really help soften an image, without softening your pixels. They are a beautiful set of glass....and well worth the money my opinion. Of course, you can *almost* create the same look in post...but I just like doing as much as I can in camera.
THE GRADE
This part is coming. I'll do you guys a tutorial on how I graded this shot, but in the meantime, here's a couple of dicky wipe's from LOG to the final ;)
For that last shot above with Ash and Misty in the bed, the lighting setup was basically the same. The only difference is that I used both soft box's (overhead), a bounced tungsten LED from the left of frame (which you can seein the first BTS pic), and of course the HMI smashing through the window haha....I also changed the direction of the lights to come from the other side of the window (to emulate a different time of day). The grade above is not how the final film will look, but I liked the magenta hues in the shadows and how the skin constrasts nicely with the deep blue in the blanket.
If you liked this article, please leave a comment! Or if you have any questions, leave them below and I'll do my best to answer them :) There are more lighting diagrams and breakdowns at the blog (27 more in fact!) so go check'm out if you're interested HERE.
